About
Blog
Stemslider
Workshops
Bouquet Recipes
Shop
New mini-StemSlider: 15% off with Bundless & FREE Vase & Engraving✨

Thinking About a Cascading Bouquet This Wedding Season?
Posted In
February 9, 2026
Posted On
Have you had a bride ask for a cascading bouquet this wedding season? Or maybe you want to feel more prepared when that request comes in?
I usually had a couple of brides each year asking for cascading bouquets. Even though I don’t receive these orders as often as round bouquets, I’ve always loved creating them even when I didn’t feel fully confident.
The waterfall shape feels so special for weddings, with its softness, movement, and sense of presence. Depending on how you design it, a cascading bouquet can feel modern and chic, uniquely structured to reflect the bride’s personality, or classic and elegant with a long, flowing tail.
At the same time, I know cascading bouquets can feel challenging for many florists. For me, one big reason was simply a lack of practice. Most of us regularly make round bouquets for weddings, but opportunities to create cascading styles come up far less often. Unless you’re intentionally practicing, it can feel intimidating when the moment arrives.
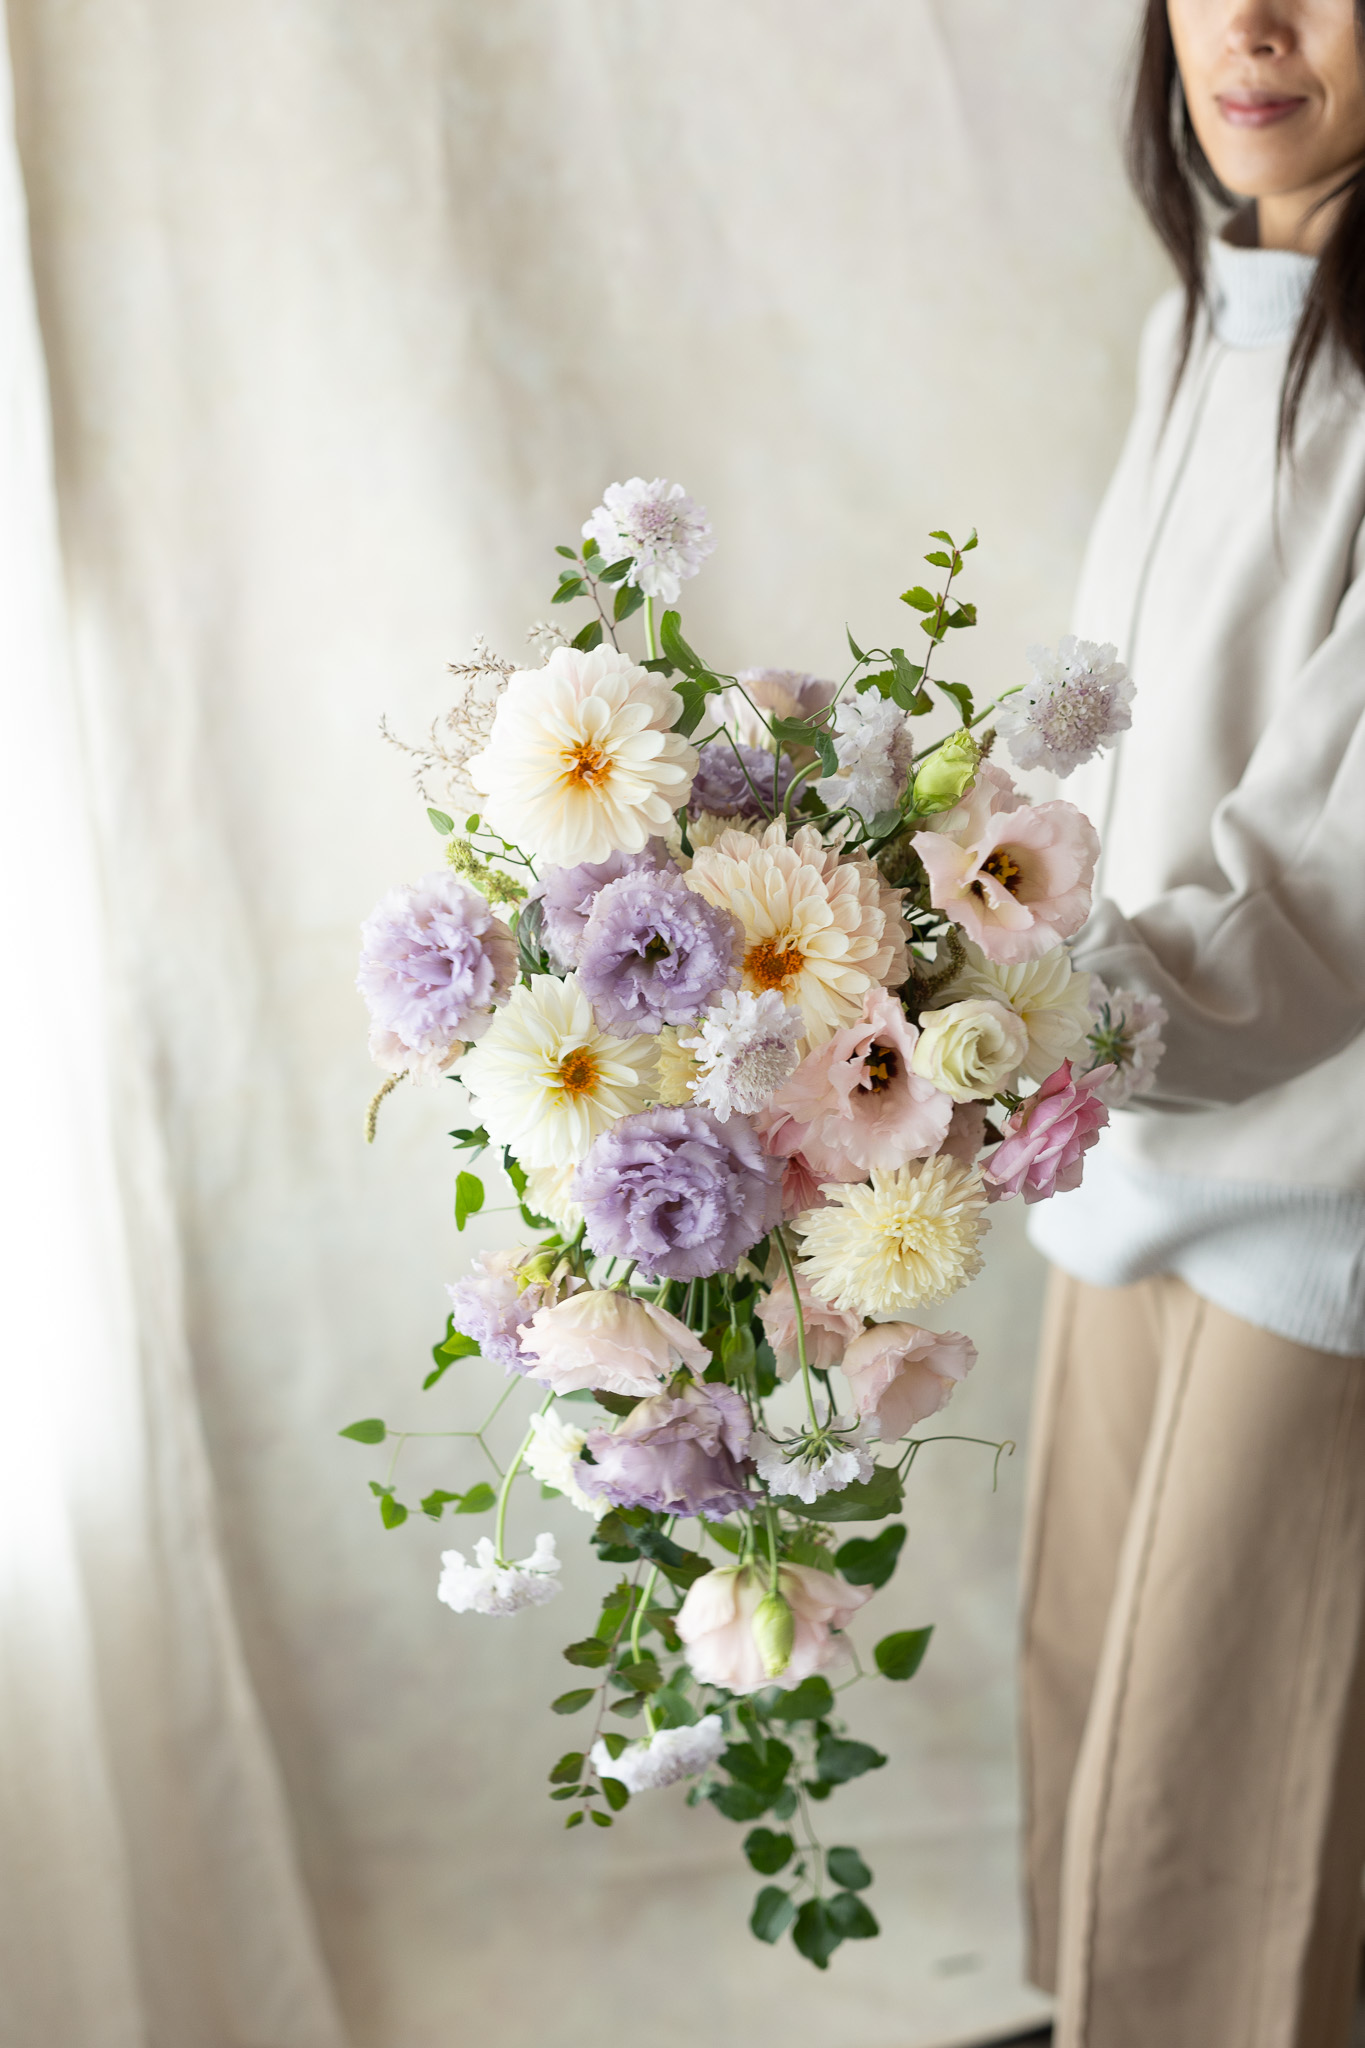
Another common challenge is balance. As more flowers are added, stems naturally shift downward, and the trail can quickly start to feel heavy. It’s easy to add more flowers to “fix” the shape , only to end up with a bouquet that’s larger and heavier than originally intended.
Because of that, I wanted to gather and share the key ideas I personally follow to create cascading bouquets that feel loose, light, and elegant. In this post, I’m bringing together what I’ve learned over time, including early mistakes and the tips that helped me improve, so you can feel more confident when the opportunity comes.
Tips for Creating a Loose, Light Cascading Bouquet
Start with fillers or supportive structure to create a frame
Flowers tend to shift downward as you add more. Using supportive fillers or structure in the middle helps keep everything in place.
This might include hardy greenery fillers like boxwood or pittosporum, branch greens, or flower fillers such as sedum, celosia, limonium , spray aster, or flowering branches. Natural supports like a small twig nest or a small piece of chicken wire or cage placed in the center can also work well.
The goal is to support heavier blooms and prevent them from sliding toward the bottom without needing to add more flowers just to hold the shape. Personally, I prefer not to use plastic cages or chicken wire inside my bouquets, so I usually rely on fillers instead.
Keep the tail light
To keep the tail looking light, avoid adding too many flowers or large blooms at the bottom.
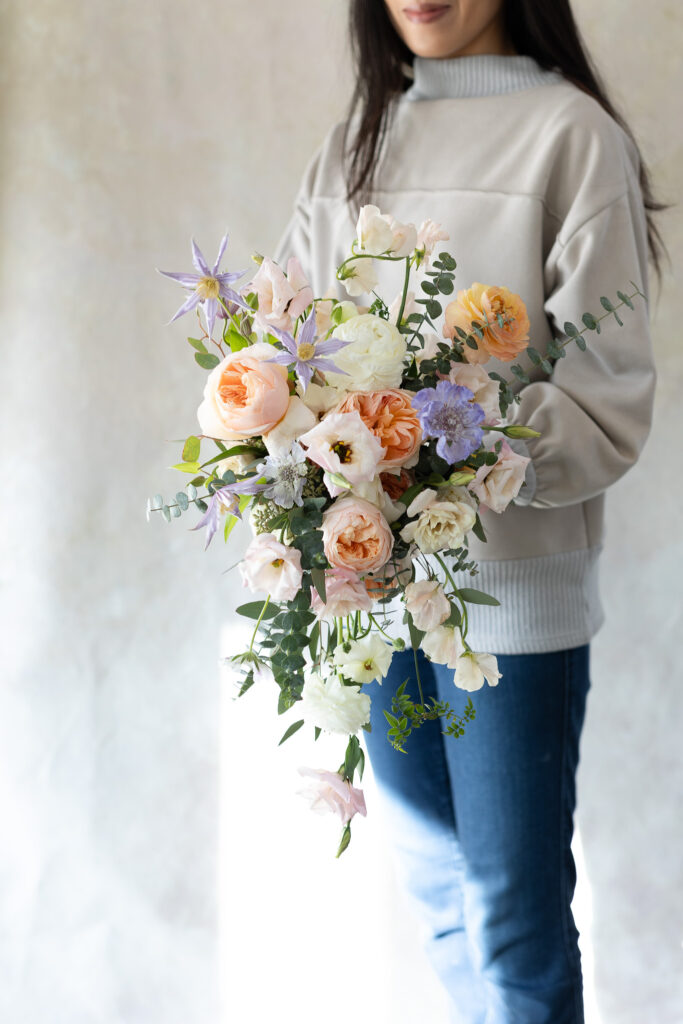
I’ve made the mistake of placing large-headed roses, ranunculus, and more flowers in the tail simply because they were beautiful, and the result was a heavier, bulkier bouquet than I intended. If you tend to add more flowers overall, you can try using fewer flowers than you think you need!
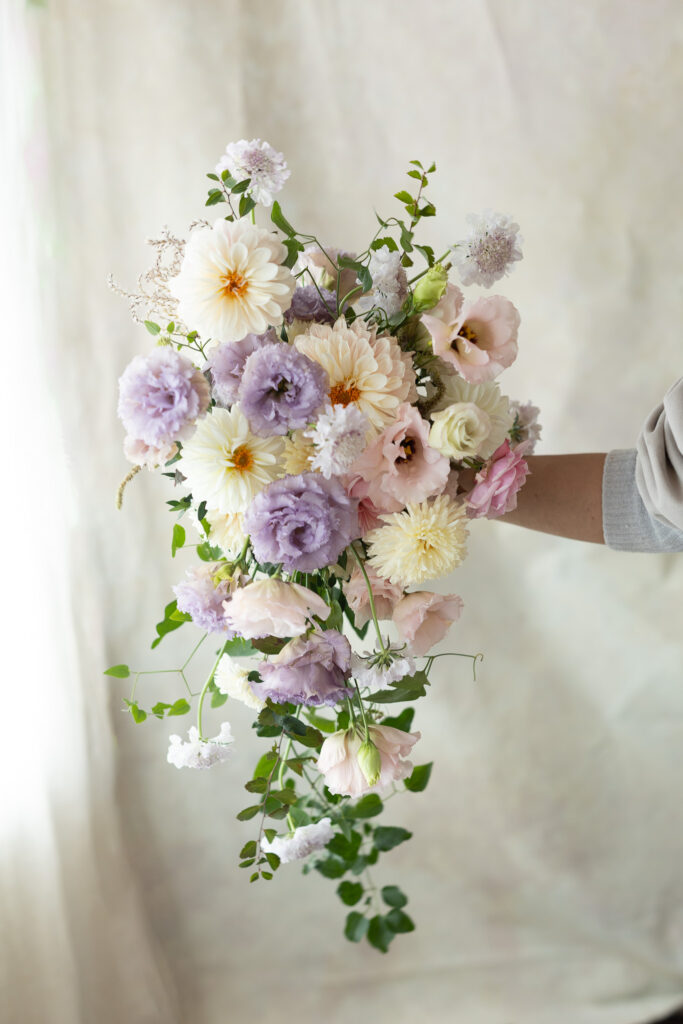
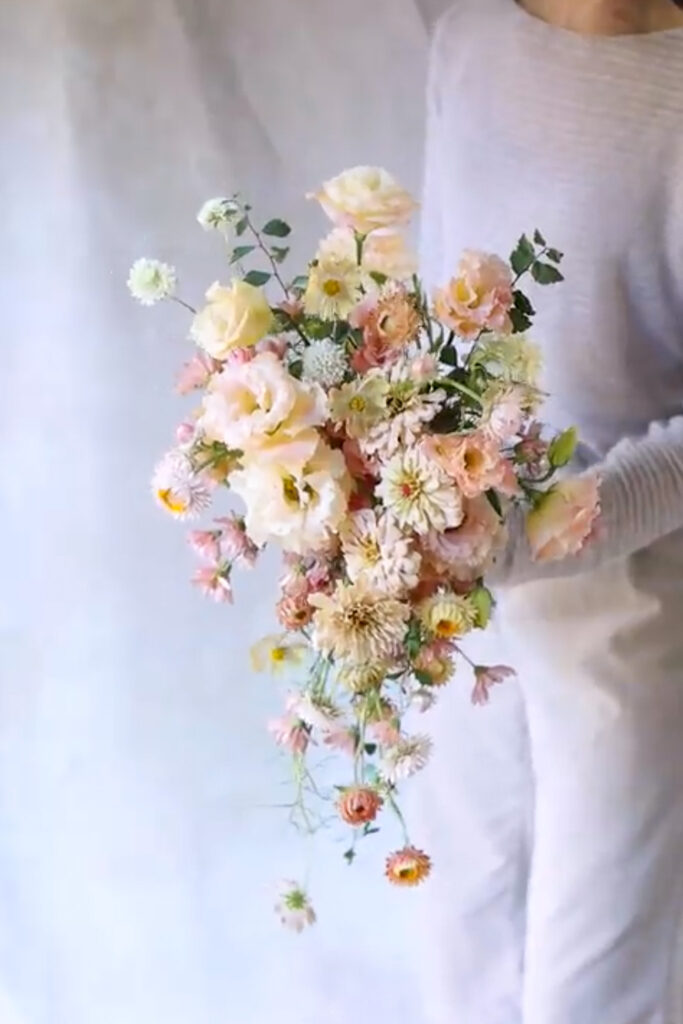
The two photos of my cascading bouquets serve as examples. The bouquet in the first photo appears heavier (and it actually was!), with more flowers concentrated in the tail, while the bouquet in the second photo looks lighter and more airy.
Pairing the tail with lighter materials like jasmine vines or airy greens placed behind focal flowers helps create softness and movement. I also shared more ideas in my post, “My Top 14 Flowers for a Beautiful Cascading Bouquet Trail.”
Add flowers upward, not toward the sides
I focus on adding flowers upward rather than toward the left and right sides. Overloading the sides can quickly make the bouquet wider and larger than intended.
Instead of adding flowers to both sides to force a perfect oval shape, aim for a narrower silhouette. Use an in-and-out method and concentrate on building height and upward flow.
Place a focal flower slightly above center and off center
I like to place the prettiest large focal flower slightly above the center and a bit to the right or left, rather than placing it directly in the middle.
I think that this draws the eye upward, making the bouquet feel lighter overall and allowing the cascading tail to appear longer.
Add movement flowers at the end
Adding movement flowers at the end of the arrangement gives the bouquet gentle motion and airiness, and adds dimension to the overall shape. These flowers can also help fill missing lines and gaps naturally.
You can find my favorite movement flowers in my post, “My Favorite Flowers to Create Softer, Flowing Garden-Style Bouquets.”
Overall note
Whether you’re an experienced designer or just beginning to explore cascading bouquets, it’s common to struggle with weight and balance. With fewer opportunities to practice compared to round bouquets, these designs can feel intimidating.
Choosing materials carefully and practicing whenever possible, even with leftover flowers or flowers from the grocery store, will absolutely improve your skills over time 😊 I now create cascading bouquets using the StemSlider bouquet tool, and we’ve been experiencing a more consistent and enjoyable process. I hope we’ll be able to share more about it in the near future!
Pin
Leave a Reply
Previous Story
next Story


I'm so glad you're here. Let's elevate your bouquet-making skill together!
